
The Lines of Melody
Melody: Part 3

In this part of the Melody series, we’ll (finally) decode the pitches in our original melody using lines. Along the way, we’ll combine our understanding of naming (Part 1) and relating pitches (Part 2) through the line-based visual framework we’ve created.
A Short Recap
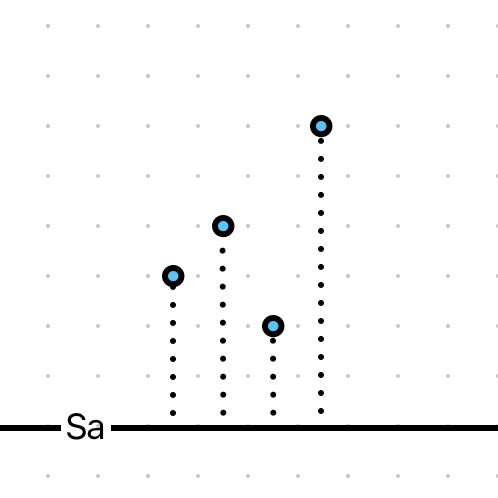
In Part 2, our goal was to pick 4 lines from a collection of 6 numbered lines and match them to the appropriate dotted blanks in the diagram below.
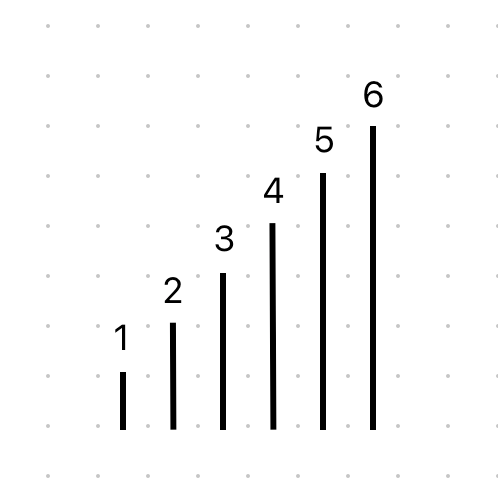
These were our 6 numbered lines:
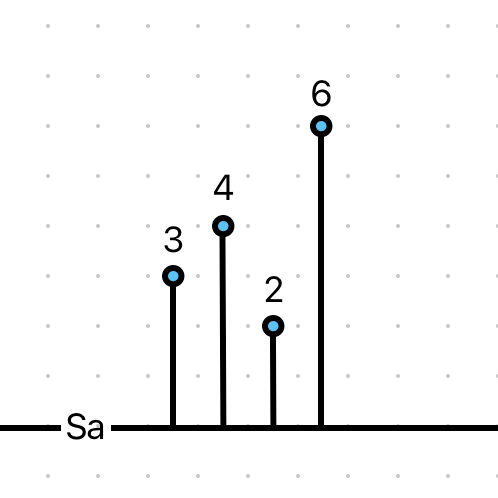
And this is what we got after matching lines to the appropriate blanks:
If you want a full refresher, please check out Part 1 and 2 from this series. That way, the current part will be much easier to follow.
Part 1:
Part 2:

Numbers to Names
Let’s bridge the gap between numbered lines and musical intervals. We’ll begin by giving each of our 6 lines a non-numerical name:
1 → Re
2 → Ga
3 → Ma
4 → Pa
5 → Dha
6 → Ni
We can call this our line dictionary. Let’s add another entry to it:
0 → Sa
Re through Ni correspond to line lengths 1 through 6, while Sa refers to a point on the baseline.
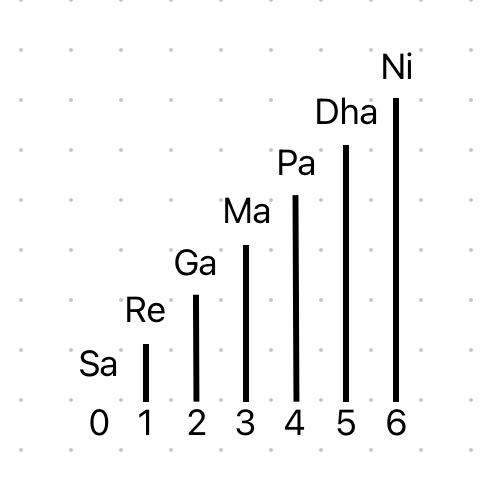
Armed with this 7-line dictionary, try filling in the right lines in the blanks below. As you match lines to blanks, remember to make a note of each line’s name:
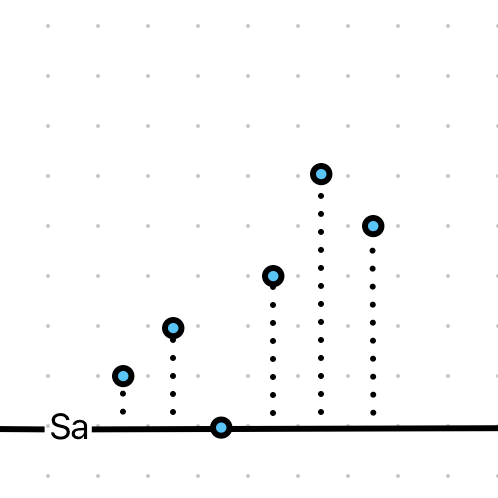
Here’s the completed version:
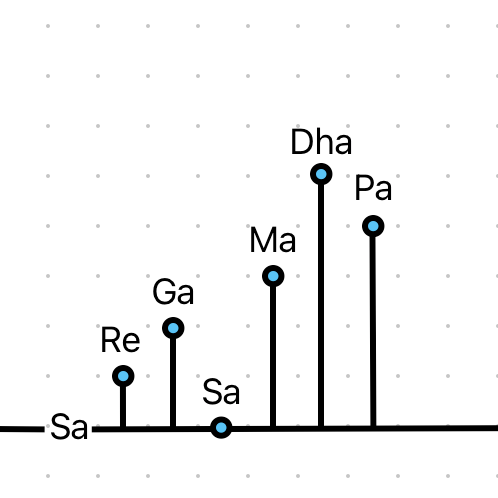
Relative Naming
If there were no lines in the above diagram, all we’d see is a bunch of points. Now we could refer to them by any odd name, but if there’s a repeating pattern at play here, why not name points based on that?
What’s the pattern here? Well, each point is at a definite height from the baseline Sa. So we could do this:
Same height → same name.
Different height → different name.
This way, we only need a handful of names.
In order to make the height of a point visually apparent, we draw a line under it. Having done this, we can ask the question: when we use names like Re and Ga, are we naming lines or are we naming points?
Well, we’re actually referring to both the line and the point by the same name (Sa, Re, Ga…, Ni).
Let’s understand this by imagining a pair of siblings: Anika and Vishal.
If we pick Anika to be the reference, and because the context is clear, we can just label Vishal as Sibling. If, on the other hand, Vishal is the reference, then Anika is now labelled Sibling. It’s a relative naming system, no pun intended.
Each line is the visual representation of a musical interval relative to the reference Sa, similar to the Sibling label.
And since we’re using the same names to refer to both points and lines, this means that: each name refers to both a pitch and its interval from Sa. This is like the label Sibling referring to both a person and the relationship they share with the reference.
For example, the name Pa refers to both a pitch and an interval, we’re not really using a separate name for the pitch. We’re only finding its interval from Sa and slapping that interval’s name onto the pitch.
But why do we do it this way?
This way of naming pitches connects very well with how most of us experience music. We don’t remember a melody as a set of disjoint pitched sounds, but as a connected set of sounds with related pitches.
Pitch is the thing we can directly hear. Interval, on the other hand, is inferred. It’s a combination of both that contributes to our experience of listening to melody/harmony.
Decoding Our Phrase
Now, we’re ready to figure out the pitches in our original melody. Here it is again:
Here is the same melody translated into a picture with points and a Sa baseline:
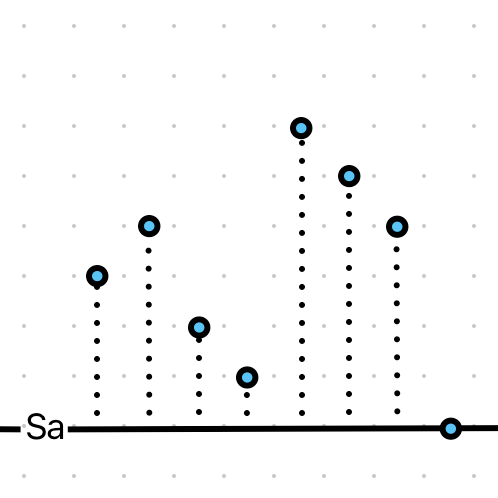
It’s your turn to notate the phrase using the 7-line dictionary. Give it a go!
And finally, here is the fruit of our labours:
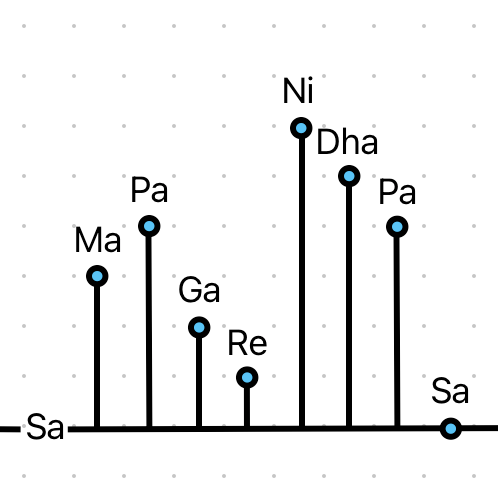
Now, let’s take everything out but the names of the lines. What are we left with?
Ma Pa Ga Re Ni Dha Pa Sa
And that’s your pitch-notated phrase! Congratulations!!
To clearly perceive the relationship between the notated diagram and the sound of the phrase, try going back and forth between them until it clicks. With time and familiarity, you’ll notice the similarities.
As a bonus, if you know how to find these notes on an instrument, you can even try playing this melody now.
Drawing Parallels to Sound
While I’ve been practicing pitch recognition for some years now, matching lines to blanks is new to me as well.
Comparing line lengths repeatedly ended up developing (at least to some degree) my intuitive sense of length perception.
If I were to continue doing this for a while, I’m sure I would get a deeper intuition for which line goes under which point almost instantaneously.
It’s much the same when listening to a phrase and figuring out its constituent pitches:
We have a reference pitch, or the baseline, which we call Sa.
We have a dictionary of intervals in relation to Sa, called Sa, Re, Ga, Ma, Pa, Dha and Ni, which is like our dictionary of line lengths.
The various unknown pitches that we hear in the phrase are like the points we saw earlier, and we fill in the blanks by figuring out which interval (Re, Ga…, Ni) will fit perfectly under which pitch.
With some practice and a dose of patience, recognising pitches (or should I say, intervals) is a skill that you can have comfortably under your belt. I began this process as an adult and I’m confident that you can too (if you haven’t already)!
Going Auditory
While we didn’t actually use sound to decode pitch, I hope you gained some insight through a visual equivalent of the process.
The aim of the visual analogy was to give those who don’t have experience recognising pitch a taste of the process, without having to develop the required auditory skills.
Now that we’ve experienced it visually though, we’ll take it up a notch in the next part by decoding melodies through sound. Since it takes time and practice to develop the full range of skills required, we’ll do it at a very small scale, but I guarantee that it will be a purely auditory experience.
If you’re interested in developing your skills to the point where you can listen to practically any melody, take it apart, reproduce it and even improvise with it, please reach out to me and I will do my best to help you out. The best part about this skill is that you can do it with pretty much any instrument: vocal, acoustic or electronic. How would you like to use this skill? Let me know in the comments.
Next → Part 4: Hearing Melodic Syllables
Liked what you saw? There’s more on its way.
If you’d like to be part of a community that deeply engages with art, science and mostly music simply for the joy of learning, then please consider subscribing to Sound Insight.